RunNumber:12,Lapse:34,Operator:me みたいなデータ)
を表形式で表示ExampleProjects/DatasourceTest/Redis に Redis Server
と,SlowDash と,テストデータ生成スクリプトが全て入った
docker-compose.yaml があるので,これを使います:
$ cd PATH/TO/SLOWDASH/ExampleProjects/DatasourceTest/Redis
$ docker compose up
システムが立ち上がったら,ブラウザで
http://localhost:18881 にアクセスしてください:
$ firefox http://localhost:18881ちなみに,docker-compose.yaml
の中身はこんな感じです:
services:
  redis:
    image: redis:8
    restart: always
    ports:
      - "6379:6379"
      - "8001:8001"

  slowdash:
    image: slowproj/slowdash
    volumes:
      - .:/project
    ports:
      - "18881:18881"
    environment:
      - DB_URL=redis://redis:6379/12

  testdata:
    image: slowproj/slowdash
    command: python /slowdash/utils/generate-testdata.py --db-url=redis://redis:6379/12
Redis Insight も入っているので,ブラウザで
http://localhost:8001 にアクセスすれば Redis
のデータを見られます.
$ git clone https://github.com/slowproj/slowdash
$ cd slowdash
$ make
$ source bin/slowdash-bashrc # 毎回やるか,`.bashrc` に書く以下のダミーデータ生成スクリプトは,既存の Redis データがあるとその内容と干渉する可能性があります.すでにデータがある場合はこの手順をスキップして,手持ちのデータを使う方がいいです.
すでにある Redis を使うならそのままでいいけれど,そうでないなら,コンテナを使うのがたぶん簡単です.
$ docker run -p 6379:6379 redisここでは,SlowDash に入っている Python ライブラリ SlowPy を使います.上記のデフォルトインストールで SlowDash 用の venv が作成されているので,最初にこれを activate してください.
$ slowdash-activate-venv # 普通に source PATH/TO/SLOWDASH/venv/bin/activate でも良いこれでダミーデータを生成するスクリプトが走るはずです:
$ cd PATH/TO/SLOWDASH/ExampleProjects/DatasourceTest/Redis
$ ./generate-testdata.sh
ここでエラーがでなければ正常に走っているはずです.
上記のデータ生成コマンドを走らせたまま,別ウィンドウでコマンドライン
SlowDash を走らせてください. (もし bin/slowdash-bashrc の
source をしていなければ,してください.)
$ cd PATH/TO/SLOWDASH/
$ source ./bin/slowdash-bashrc
$ cd ExampleProjects/DatasourceTests/Redis
$ slowdash channels
Running in venv at /PATH/TO/SLOWDASH/venv
[{"name": "Status", "type": "tree"}, {"name": "test_graph_01", "type": "graph"}, {"name": "test_histogram_01", "type": "histogram"}, {"name": "ch00", "type": "timeseries"}, {"name": "ch10", "type": "timeseries"}, {"name": "ch14", "type": "timeseries"}, {"name": "ch04", "type": "timeseries"}, {"name": "ch15", "type": "timeseries"}, {"name": "ch03", "type": "timeseries"}, {"name": "ch11", "type": "timeseries"}, {"name": "ch02", "type": "timeseries"}, {"name": "ch09", "type": "timeseries"}, {"name": "ch08", "type": "timeseries"}, {"name": "ch13", "type": "timeseries"}, {"name": "ch05", "type": "timeseries"}, {"name": "ch06", "type": "timeseries"}, {"name": "ch01", "type": "timeseries"}, {"name": "ch07", "type": "timeseries"}, {"name": "ch12", "type": "timeseries"}]
ちゃんとデータが見えているので,ポート番号を指定して SlowDash をサーバーモードで走らせます:
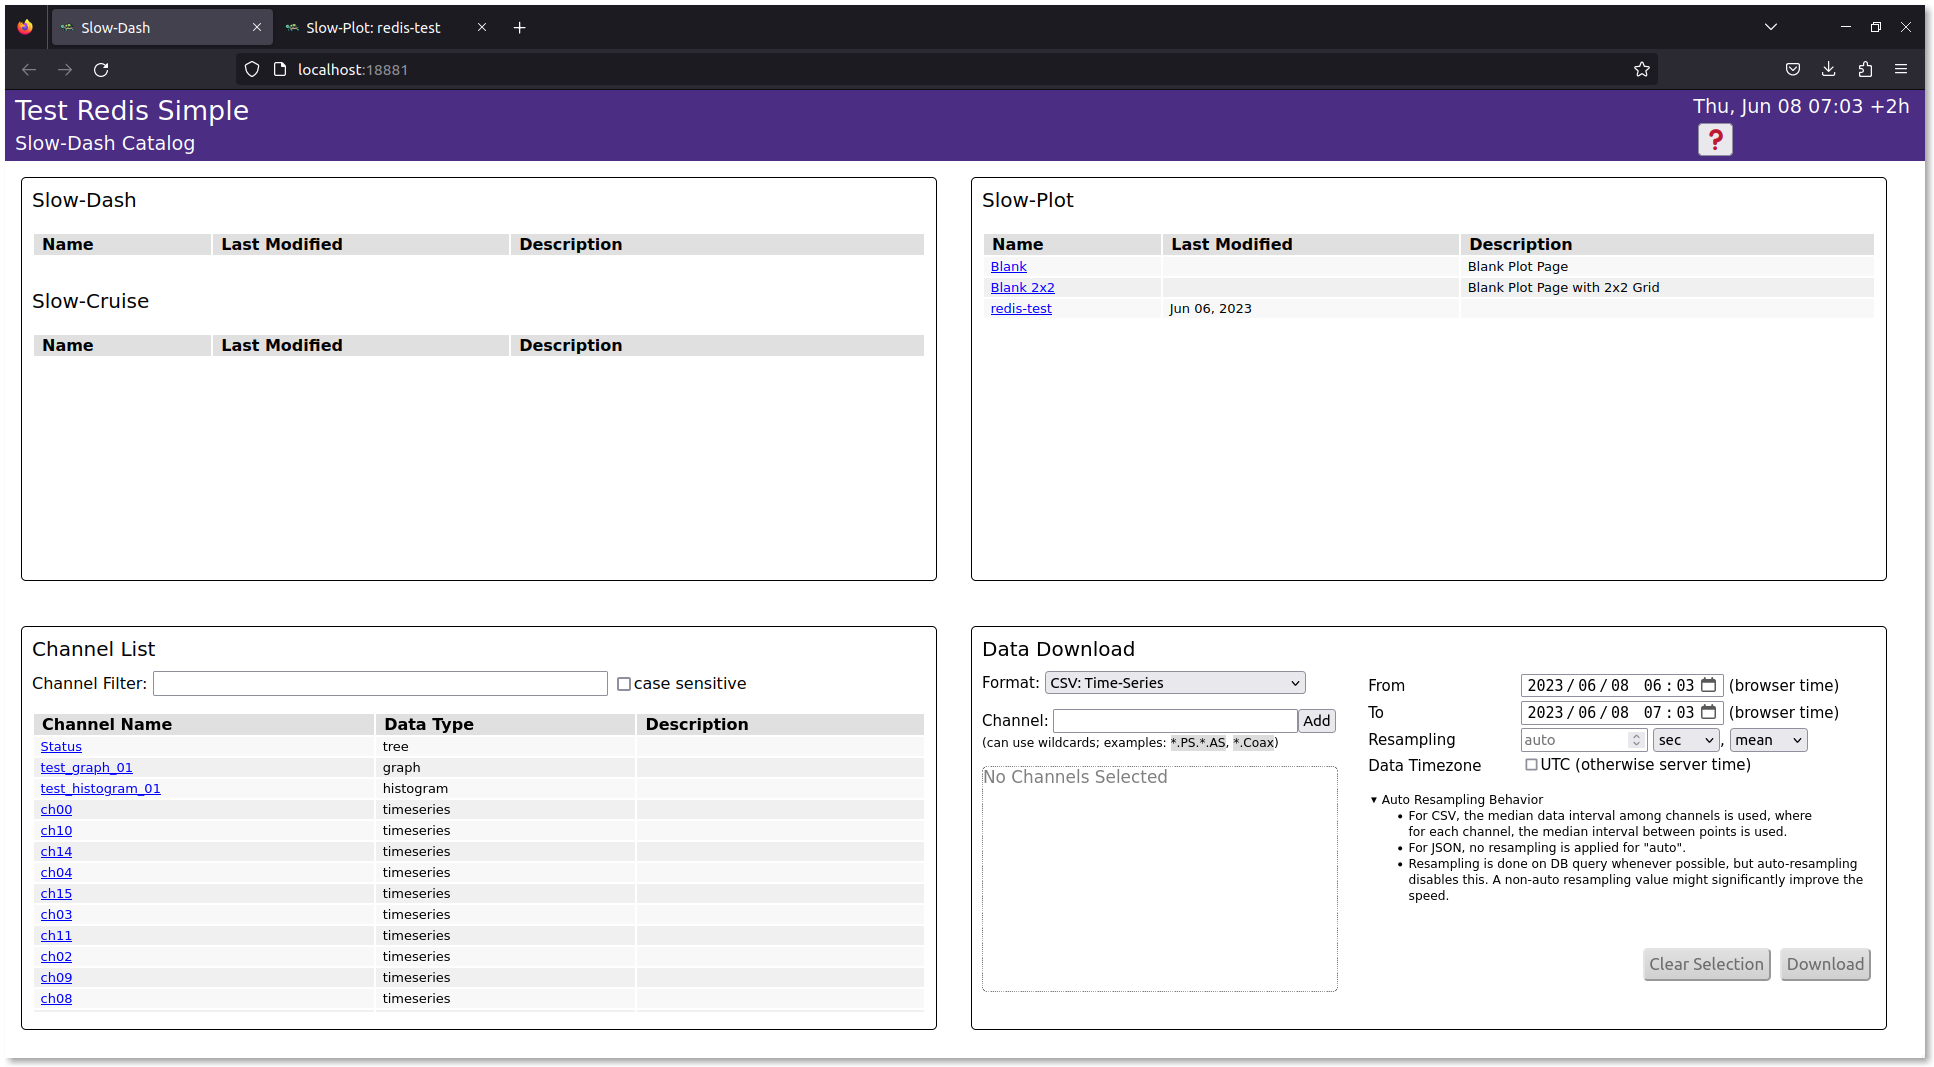
$ slowdash --port=18881ブラウザで http://localhost:18881/ に接続
$ firefox http://localhost:18881/
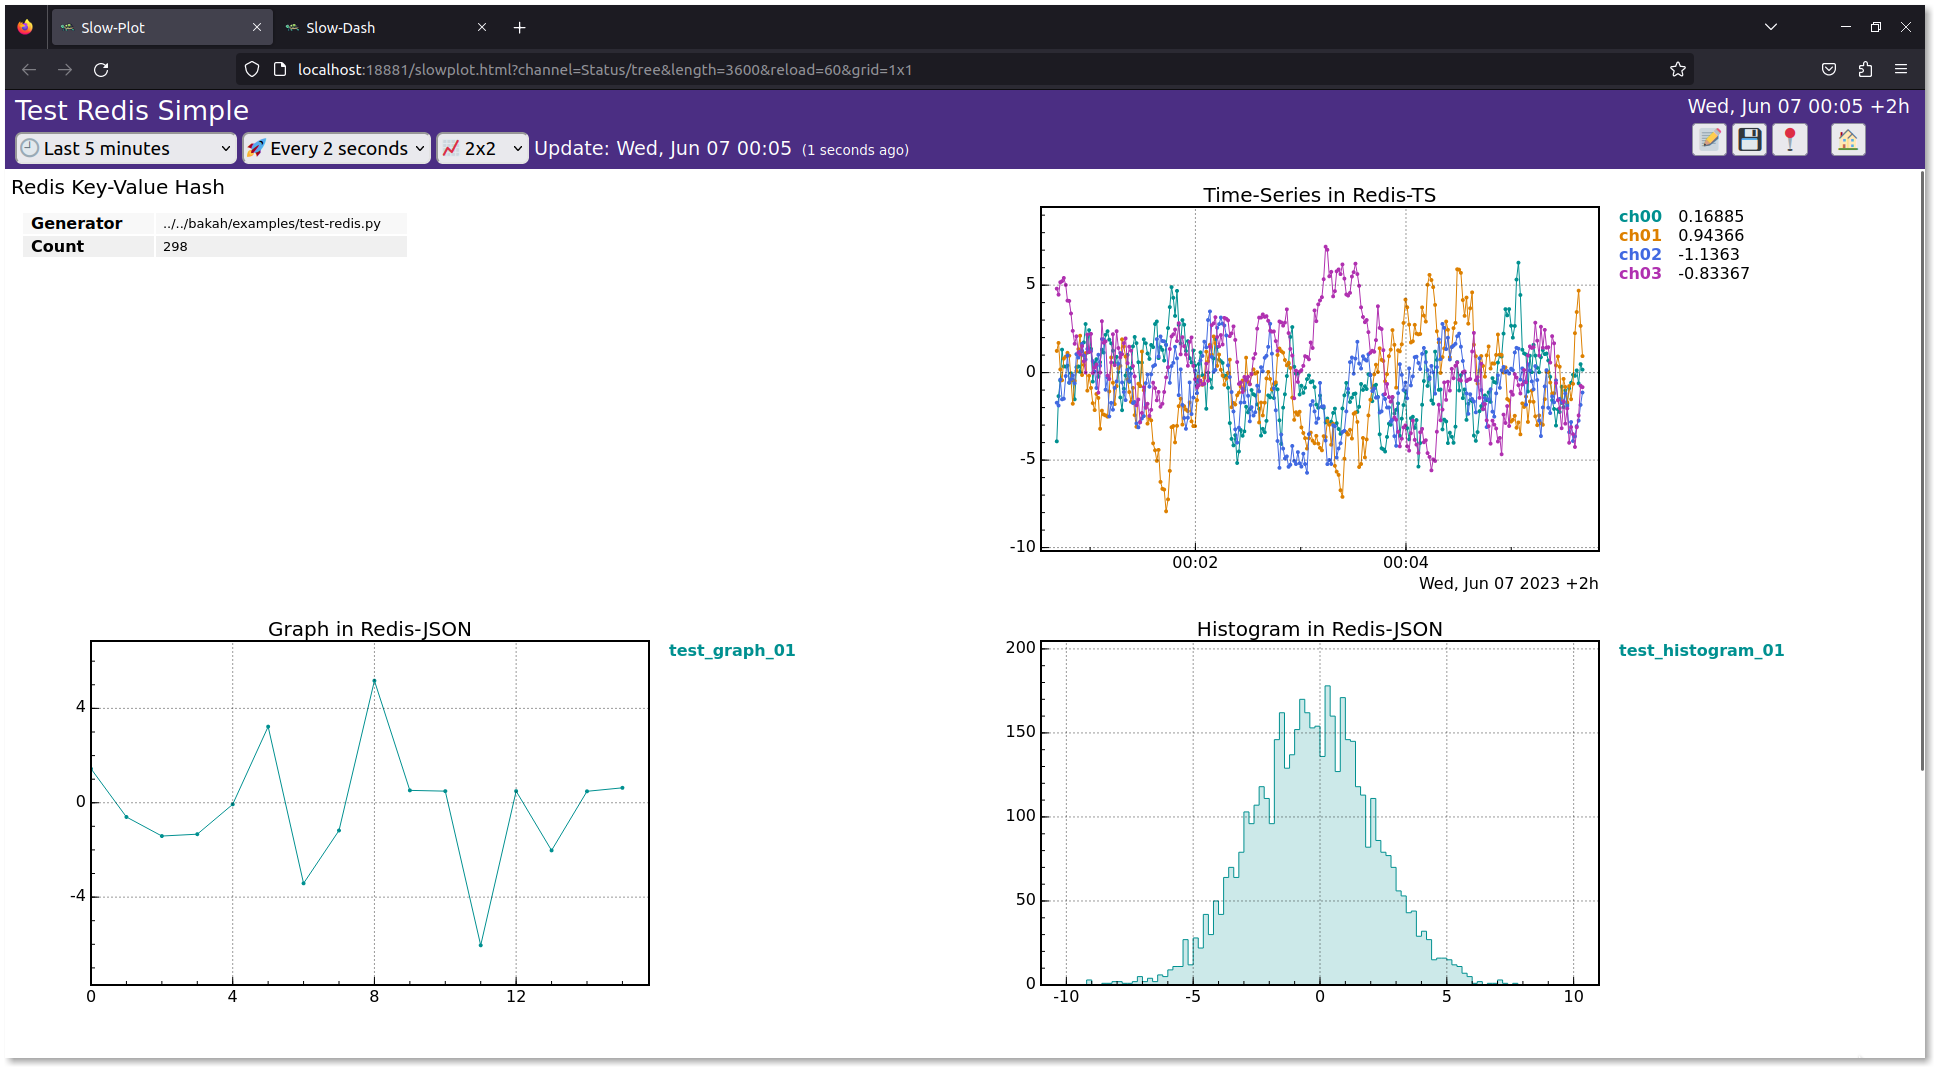
右上のアイコンは,作成済レイアウトです.クリックすると以下のような画面が表示されます.
動作テストに使った ExampleProjects/DatasourceTests/Redis
の SlowdashProject.yaml に設定を記述します. Redis
サーバのアドレス,ポート番号とデータベース番号を指定するだけです.
slowdash_project:
  data_source:
url: redis://localhost:6379/1複数のデータベース番号を使いたいときは,data_source
を配列にできます.ただ,これは省略形式で,正式には,以下のようにデータ形式ごとにエントリを作ります.こうするとよりきめ細かくパラメータを設定できます.
slowdash_project:
  name: RedisTest
  title: Redis Test, Simple version

  data_source:
    url: redis://localhost:6379/
    parameters:
      hash: { db: 1 }
      time_series:
        - db: 2
        - db: 3
          suffix: '.second_TS'
object: { db: 1 }| エントリ名 | データ |
|---|---|
hash |
Redis ハッシュ値が SlowDash の Tree として読まれる |
time_series |
Redis TS 値が SlowDash の TimeSeries として読まれる |
object |
Redis JSON 値が SlowDash の Histogram / Graph / etc. として読まれる |
object_time_series |
Redis TS と Redis JSON を組み合わせた SlowDash 形式でオブジェクトの時系列が格納されている場合 |
複数のデーターベース間でキーの重複がある場合は,suffix
パラメータを指定すると,SlowDash
チャンネル名にサフィックスが付いて区別できます.
Redis TimeSeries で記録したデータは自動で検出され,チャンネルリストに表示されます.
Redis の通常の Key-Value でハッシュ値を記録した場合,SlowDash の Tree 型として取り込まれます.動作テスト例では左上のパネルに表示されています.
Redis JSON を使って特定の構造の JSON オブジェクトを記録すると SlowDash にヒストグラムやグラフとして認識されます.
Python のコードはこんな感じです:
import redis
r = redis.Redis('localhost', 6379, 1)
hist = {
  'bins': { 'min': 0, 'max': 100 },
  'counts': [ 3, 5, 8, 14, 11, 3, 6, 4, 4, 1 ]
}
r.json().set('hist00', '$', hist)
あるいは,普通の Key-Value に,JSON 文字列で保存しても良いです (C++ とかからならこちらの方が便利かも):
import redis
r = redis.Redis('localhost', 6379, 1)
hist = '''{
  "bins": { "min": 0, "max": 100 },
  "counts": [ 3, 5, 8, 14, 11, 3, 6, 4, 4, 1 ]
}'''
r.set('hist00', hist)
JSON のデータ構造は以下のようになっています:
{
    "bins": {"min": MIN, "max": MAX},
    "counts": [C0, C1, C2, ...]
}
counts があることにより,この JSON
がヒストグラムだと判別される.counts
配列の長さで決められる.{
"labels": [ XLABEL, YLABEL ],
"x": [x0, x1, x2, ...],
"y": [y0, y1, y2, ...],
}y があることにより,この JSON
がグラフだと判別される.Data Model を参照.
Redis TimeSeries と Redis JSON を組み合わせて実現されています.構造が面倒なので,SlowPy ライブラリを使うのが便利です.
こんな感じ:
import time
import numpy as np
from slowpy import Histogram
from slowpy.store import DataStore_Redis


datastore = DataStore_Redis('redis://localhost/2', retention_length=3600)
histogram = Histogram(nbins=20, range_min=-10, range_max=10)

while True:
    for i in range(100):
        h.fill(np.random.normal(5, 2))

    # これ
    datastore.append(histogram, tag='test_histogram_01')

    time.sleep(1)
ヒストグラムやグラフの時系列データは大量のキーバリューを作るので、専用のデータベースを使用した方が良いです.この例ではデータベース番号 2 番を使用しています.
ちなみに,append() の代わりに update()
とすると,時刻情報なしでチャンネルごとの最新値だけを同じキーで保存するようになります(上記の例).