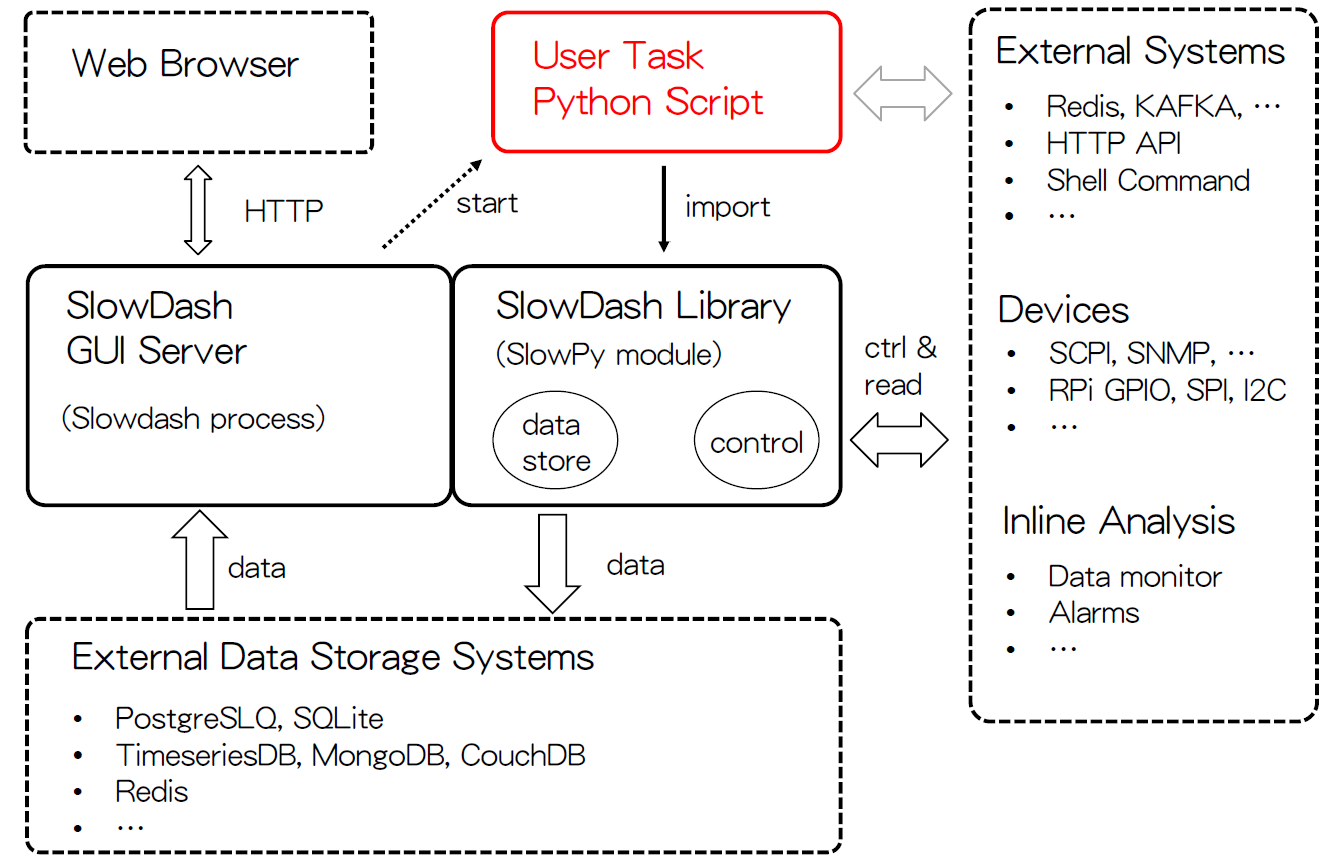
SlowDash integrates Python scripts written by users, with features including:
SlowDash provides a Python library, slowpy, that offers
functions for:
Although the GUI can access the variables and functions in user scripts, the scripts themselves are normal Python scripts and can utilize all Python features and libraries, including NumPy, SciPy, scikit-image, and scikit-learn.
slowpy, is provided to be imported by
user task scripts for:
from slowpy.control import ControlSystem
ctrl = ControlSystem()

# Create a control node for SCPI command "MEAS:VOLT:DC" on a device at 192.168.1.43
V = ctrl.ethernet(host='192.168.1.43', port=5025).scpi().command('MEAS:VOLT:DC')

while True:
  # Read a value from the control node using SCPI command "MEAS:VOLT:DC?"
  value = V.get()
...from slowpy.store import DataStore_PostgreSQL
datastore = DataStore_PostgreSQL('postgresql://postgres:postgres@localhost:5432/SlowTestData', table="SlowData")
while True:
value = ...
datastore.append(value, tag="voltmeter")If you have a User Task Script like this:
def set_Vout(value):
    Vout.set(value)
and write a SlowDash HTML panel like this:
<form>
  Voltage output: <input name="value">
  <input type="submit" name="test.set_Vout()" value="Set">
</form>
Then, clicking the Set button will call the function
set_Vout() with a parameter from the value
input field.
For control nodes V, defining an _export()
function in the User Task Script will export the node values, making
them available in the SlowDash GUI in the same way as values stored in
the database.
device = ctrl.ethernet(host='192.168.1.43', port=5025).scpi()
V = device.command('MEAS:VOLT:DC')
A = device.command('MEAS:CURR:DC')
def _export():
    return [
        ('Voltage', V),
        ('Current', A)
    ]
Only the “current” (present) values are available in this way. If you need historical values, store the values in a database.
In slowdash/ExampleProjects/SlowTask there is a SlowDash
project that demonstrates some of the features described here.
$ cd slowdash/ExampleProjects/SlowTask/Basic
$ slowdash --port=18881
or
$ cd slowdash/ExampleProjects/SlowTask/Basic
$ docker compose upSlowPy is a Python library (module) that provides functions such as:
The SlowPy library is included in the SlowDash package under
slowdash/lib/slowpy. By running
source slowdash/bin/slowdash-bashrc, as instructed in the
Installation section, this path will be included in the environment
variable PYTHONPATH, so that users can use the library
without modifying their system. It is also possible to install the
library in the usual way: you can run
pip install slowdash/lib/slowpy to install SlowPy into your
Python environment. You might want to combine this with
venv to avoid affecting your Python environment.
SlowPy provides a unified interface to connect external software
systems and hardware devices; everything is mapped into a single
“ControlTree” where each node has set() and
get() methods. The tree represents the logical structure of
the system. For example, a SCPI command of VOLT to a power
supply unit connected via Ethernet would be addressed like
ControlSystem.ethernet(host, port).scpi().command('VOLT'),
and set(value) on this node will send a SCPI command of
VOLT value to the device. The get() method
performs a read operation and returns a value.
Plugin modules can dynamically add branches to the control tree. For
example, the Redis plugin adds the redis() node and several
sub-branches for functions provided by Redis, such as hash, JSON, and
time-series. Plugins are loaded to a node, not necessarily to the root
ControlSystem; for example, a plugin that uses Ethernet is loaded to an
Ethernet node, creating a sub-branch under the Ethernet node, and the
plugin can make use of the functions provided by the Ethernet node such
as send() (which is set() of the node) and
receive() (which is get()).
Here is an example of using SlowPy Controls. In this example, we use a power supply device that accepts SCPI commands through Ethernet.
from slowpy.control import control_system as ctrl

# Create a control node for SCPI command "VOLT" (output) and "MEAS:VOLT:DC" (readback) on a device at 192.168.1.43
device = ctrl.ethernet(host='192.168.1.43', port=5025)
Vout = device.scpi(append_opc=True).command('VOLT')
V = device.scpi().command('MEAS:VOLT:DC')

# Write a value to the control node: this will issue SCPI command "VOLT 10;*OPC?"
Vout.set(10)

while True:
  # Read a value from the control node using SCPI command "MEAS:VOLT:DC?"
  value = V.get()
  ...
A common starting point would be importing
slowpy.control and then creating an instance of the
ControlSystem class, or import an instance
(control_system) directly.
The ControlSystem already includes the
Ethernet plugin, but if it were not included, the plugin
loading code would be:
ctrl.import_control_module('Ethernet')This will search for a file named control_Ethernet.py
from search directories, load it, and inject the ethernet()
Python method to the node class that loaded the plugin (which is
ControlSystem in this case). The Ethernet plugin already includes
sub-branches for SCPI; for specific protocols not already included, a
plugin would be loaded onto the Ethernet node.
Each node constructor takes parameters. In this example, the Ethernet
node, which sends and receives data to/from Ethernet, takes the host/IP
and port parameters, and a SCPI command node, which is bound to a
specific SCPI command, takes the SCPI command parameter with optional
set_format which overrides the default SCPI command for
writing. (The default SCPI commands to be written/read for
.scpi().command(CMD) are CMD and
CMD?, respectively. Often, write operations should wait for
command completion, and SlowPy expects a return value from each command.
A technique to achieve this, regardless of the actual command behaviors
of the device, is to append OPC? to the command, as done in
the example.)
Once you have the control node object, you can call
node.set(value) to write the value, and call
value=node.get() to read from it. As a shortcut,
node(value) is equivalent to node.set(value),
and value=node() is equivalent to
value=node.get(). Also, control nodes define Python’s
__str__(), __float__(), etc., so
print(node) and x = float(node) will
implicitly call node.get().
If a control node has threading methods run() or
loop(), calling start() on the node will
create a dedicated thread and start it. This is useful for:
set()
and get() queries, such as PID loops.The run() function is called once, and then
loop() is called repeatedly. In the loop()
function, sleep() or similar must be inserted to control
the frequency.
The thread is stopped by calling the stop() method of
the node, or by a global stop request (such as
ControlSystem.stop() or by signals). The run()
function must watch for stop requests (by
is_stop_requested()) and terminate itself when a stop
request is made. loop() will not be called after a
stop.
Naming convention: set(), get(), and
do_XXX() are usual methods to perform actions. Methods with
noun names return sub-nodes.
ControlSystem.import_control_module('Ethernet')
cmd value and waits for a
replycmd? and waits for a reply, then returns
the replycmd value line_terminator,
consumes echocmd line_terminator, consumes echo, and
returns a reply until the next promptControlSystem.import_control_module('HTTP')
base_url
path with value as its contentbase_url
path and returns the reply contentvalue is a Python object to be converted to
JSONControlSystem.import_control_module('Shell')
cmd value,cmd and returns the resultadc0 = ctrl.shell('read_adc').arg('--ch=0')
ControlSystem.import_control_module('HTTP').import_control_module('Slowdash')
pongControlSystem.import_control_module('Redis')
All control nodes (derived from
slowpy.control.ControlNode) have the following methods:
get()condition_lambda returns True if the
lambda is not None; if condition_lambda is
None, wait until has_data() returns
True. On timeout, wait() returns
None, and on a stop request, it returns False.
Otherwise, it returns True.get() which calls
parent_node.get()set() which calls
parent_node.set()Nodes derived from ControlValueNode have the following
methods:
set(value) of the parent node.get()set(0) will stop the current ramping if it
is runningTrue if ramping is in progress,
otherwise returns FalseNodes derived from ControlThreadNode have the following
methods:
run() and/or
loop(), if the node has one of these methods (or both)Simple example of writing single values to a long-form table:
import time
from slowpy.control import RandomWalkDevice
from slowpy.store import DataStore_PostgreSQL

device = RandomWalkDevice(n=4)
datastore = DataStore_PostgreSQL('postgresql://postgres:postgres@localhost:5432/SlowTestData', table="Test")

while True:
    for ch in range(4):
      value = device.read(ch)
      datastore.append(value, tag='%02d'%ch)

    time.sleep(1)
Example of writing a dict of key-values:
while True:
    record = { 'ch%02d'%ch: device.read(ch) for ch in range(4) }
    datastore.append(record)
    time.sleep(1)
For SQL databases, the “long format” with UNIX timestamps is used by
default. To use other table schemas, specify a user-defined
TableFormat:
class QuickTourTestDataFormat(LongTableFormat):
    schema_numeric = '(datetime DATETIME, timestamp INTEGER, channel STRING, value REAL, PRIMARY KEY(timestamp, channel))'
    schema_text = '(datetime DATETIME, timestamp INTEGER, channel STRING, value REAL, PRIMARY KEY(timestamp, channel))'

    def insert_numeric_data(self, cur, timestamp, channel, value):
        cur.execute(f'INSERT INTO {self.table} VALUES(CURRENT_TIMESTAMP,%d,?,%f)' % (timestamp, value), (channel,))

    def insert_text_data(self, cur, timestamp, channel, value):
        cur.execute(f'INSERT INTO {self.table} VALUES(CURRENT_TIMESTAMP,%d,?,?' % timestamp), (channel, value))

datastore = DataStore_SQLite('sqlite:///QuickTourTestData.db', table="testdata", table_format=QuickTourTestDataFormat())SlowPy provides commonly used data objects such as histograms and graphs. These objects can be directly written to the database using the SlowPy Database Interface described above.
import slowpy as slp
hist = slp.Histogram(100, 0, 10)

device = ...
datastore = ...

while not ControlSystem.is_stop_requested():
  value = device.read(...
  hist.fill(value)
  data_store.append(hist, tag="test_hist")
data_store.append(hist, tag=name) will create a
time-series of histograms (one histogram for each time point). To keep
only the latest histogram, use
data_store.update(hist, tag=name) instead.
import slowpy as slp
graph = slp.Graph(['channel', 'value'])

while not ControlSystem.is_stop_requested():
  for ch in range(n_ch):
    value = device.read(ch, ...
    graph.fill(ch, value)
  data_store.append(graph, tag="test_graph")
data_store.append(graph, tag=name) will create a
time-series of graphs (one graph for each time point). To keep only the
latest graph, use data_store.update(graph, tag=name)
instead.
import slowpy as slp
rate_trend = slp.RateTrend(length=300, tick=10)

while not ControlSystem.is_stop_requested():
  value = device.read(...
  rate_trend.fill(time.time())

data_store.append(rate_trend.time_series('test_rate'))If your device has some programming capability, such as Raspberry Pi GPIO, an easy way to integrate it into a SlowDash system is to implement the SCPI interface on it. This approach is also useful to integrate other non-Ethernet devices (such as USB) connected to a remote computer.
Here is an example to wrap a device with Ethernet-SCPI capability:
from slowpy.control import ScpiServer, ScpiAdapter, RandomWalkDevice

class RandomWalkScpiDevice(ScpiAdapter):
    def __init__(self):
        super().__init__(idn='RandomWalk')
        self.device = RandomWalkDevice(n=2)

    def do_command(self, cmd_path, params):
        '''
        parameters:
          cmd_path: array of strings, SCPI command split by ':'
          params: array of strings, SCPI command parameters split by ','
        return value: reply text (even if empty) or None if command is not recognized
        '''

        # Implemented Commands: [ "VOLTage Value", "MEASure:VOLTage:DC?" ]
        # Common SCPI commands, such as "*IDN?", are implemented in the parent ScpiAdapter class
        if cmd_path[0].startswith('VOLT') and len(params) == 1:
            try:
                self.device.write(0, float(params[0]))
            except:
                self.push_error(f'bad parameter value: {params[0]}')
            return ''

        elif cmd_path[0].startswith('MEAS'):
            if len(cmd_path) == 3 and cmd_path[1].startswith('VOLT') and cmd_path[2] == 'DC':
                return self.device.read(0)
            else:
                self.push_error(f'invalid command {":".join(cmd_path)}')
            return ''

        return None

device = RandomWalkScpiDevice()
server = ScpiServer(device, port=5025)
server.start()
In the parent class, ScpiAdapter, the following standard
SCPI commands are defined. The default behaviors can be customized by
overriding the methods shown in the table.
| Command | Description | To Override |
|---|---|---|
*IDN? |
returns the ID given in the __init__(idn=ID)
method |
— |
*OPC? |
returns the value of self.is_running |
do_OPC(self) |
SYST:ERR? |
returns the errors set by self.push_error(msg) |
— |
*CLS |
clears the errors | do_CLS(self) |
*RST |
clears the errors and set self.is_running False |
do_RST(self) |
Once the code is tested, make it start automatically on PC boot in
your preferred way (/etc/rc.local, Docker, …).
If SlowPy Control Nodes are already available for the device, the nodes can be directly mapped to the SCPI interface:
from slowpy.control import ControlSystem, ScpiServer, ScpiAdapter

ControlSystem.import_control_module('DummyDevice')
device = ControlSystem().randomwalk_device()

adapter = ScpiAdapter(idn='RandomWalk')
adapter.bind_nodes([
    # Randomwalk Configuration
    ('CONFIGure:WALK', device.walk().setpoint(limits=(0,None))),
    ('CONFIGure:DECAY', device.decay().setpoint(limits=(0,1))),

    # Common SCPI commands for power supplies and voltmeters
    ('VOLTage', device.ch(0).setpoint()),
    ('MEASure:VOLTage:DC', device.ch(0).readonly()),
])

server = ScpiServer(adapter, port=5025)
server.start()SlowTask is a user Python script placed under the SlowDash config
directory with a name like slowtask-XXX.py. The SlowDash
GUI can start/stop the script, call functions defined in the script, and
bind control variables in the script to GUI elements. The SlowPy library
was designed for use in user task scripts, but this is not a
requirement.
SlowTask script files (such as slowtask-test.py) are
placed under the project configuration directory. By default, tasks are
“listed” in the Task Manager panel of the SlowDash web page, but they
will not be “loaded” until the start button is clicked.
Auto-loading can be set by making an entry in the SlowDash configuration
file (SlowdashProject.yaml):
slowdash_project:
  ...

  task:
    name: test
    auto_load: true
    parameters:
      default_ramping_speed: 0.1

  system:
    our_security_is_perfect: false
The parameters are optional, and if given, these will be passed to
the _initialize(params) function of the script (described
later).
Setting system/our_security_is_perfect to
true will enable editing of the Python scripts on the
SlowDash web page. While this is convenient, please keep in mind what it
means. Python scripts can do anything, such as
system("rm *"). You can only use this feature when access
is strictly controlled. Some secure systems run processes only in Docker
containers, where the container system runs on a virtual machine (in
case the container is compromised) inside a firewall that accepts only
VPN or SSH connections from listed addresses. Additionally, to prevent
unintended destruction by novice operators, it may be safer to run two
instances of SlowDash: one with full features and one with limited
operations (without or only with selected tasks). The
slowdash command has an option to specify which
configuration file to use.
Functions in SlowTask scripts can be called from the SlowDash GUI. If
a script (named test) has a function like this
def destroy_apparatus():
  #... do your work here
This can be called from the SlowDash GUI in several ways.
From an HTML form panel in SlowPlot, clicking a
<button> with a name of the task module and the
function will call the function:
<form>
  <input type="submit" name="test.destroy_apparatus()" value="Finish">
</form>
Here, the parentheses at the end of the button name indicate that this button is bound to a SlowTask function.
The prefix (test. in this example) is the module name,
which is taken from the module file name by stripping the beginning
‘slowtask-’. If the module name includes -, those will be
replaced with _. The prefix can be explicitly specified in
the SlowdashProject.yaml configuration file as:
  task:
    name: another_test
    namespace:
      prefix: test.
Note that the dot is part of the prefix.
SlowTask functions can take parameters:
def set_V0(voltage:float, ramping:float):
  #... do your work here
and these parameter values are taken from the form input values:
<form>
  Voltage: <input type="number" name="voltage" value="0"><br>
  Ramping: <input type="number" name="ramping" value="1"><br>
  <input type="submit" name="test.set_V0()" value="Set">
</form>
By using the type notation in the SlowTask function as shown above, the parameter values are converted to the specified types. If the value literal cannot be converted to the specified type, an error response will be returned to the browser and the SlowTask function will not be called.
The SlowTask function can be either the standard def or
async def.
It is possible to place multiple buttons in one form:
<form>
  Ramping: <input type="number" name="ramping" value="1" style="width:5em">/sec
  <p>
  V0: <input type="number" name="V0" value="0"><input type="submit" name="reentrant test.set_V0()" value="Set"><br>
  V1: <input type="number" name="V1" value="0"><input type="submit" name="reentrant test.set_V1()" value="Set"><br>
  V2: <input type="number" name="V2" value="0"><input type="submit" name="reentrant test.set_V2()" value="Set"><br>
  V3: <input type="number" name="V3" value="0"><input type="submit" name="reentrant test.set_V3()" value="Set"><br>
  <p>
  <input type="submit" name="test.set_all()" value="Set All">
  <input type="submit" name="reentrant test.stop()" value="Stop Ramping"><br>
</form>
def set_V0(V0:float, ramping:float):
#...
def set_V1(V1:float, ramping:float):
#...
#...The input values on the Web form will be bound to the function
parameters based on the names (<input name="V0"> will
be bound to the V0 parameter).
In the example above, some functions have the reentrant
qualifier: by default, if a previous function call is in execution, the
next action cannot be accepted to avoid multi-threading issues in the
user code. The reentrant qualifier indicates that this
function can run in parallel to others or to itself. Another common
qualifier is await, which instructs the web browser to wait
for completion of the function execution before doing anything else
(therefore, the browser will appear frozen).
On a canvas panel, a button to call a task can be placed by:
{
    ...
    "items": [
        {
            "type": "button",
            "attr": { "x":400, "y": 630, "width": 130, "label": "Finish Experiment" },
            "action": { "submit": { "name": "test.destroy_apparatus()" } }
        },
        ...
For functions with parameters, a form can be used:
{
    ...
    "items": [
        {
            "type": "valve",
            "attr": { ... },
            "metric": { "channel": "sccm.GasInlet", ... },
            "action": { "form": "FlowControl" }
        },
        ...
    ],
    "forms": {
        "FlowControl": {
            "title": "Injection Flow",
            "inputs": [
                { "name": "flow", "label": "Set-point (sccm)", "type": "number", "initial": 15, "step": 0.1 }
            ],
            "buttons": [
                { "name": "ATDS.set_flow()", "label": "Apply Set-point" },
                { "name": "ATDS.stop_flow()", "label": "Close Valve" }
            ]
        }
    }
    ...
For more details, see the UI Panels section.
If a SlowTask script has functions of
_initialize(params), _finalize(),
_run(), and/or _loop(), one dedicated thread
will be created, and these functions are called in a sequence:
| function | description |
|---|---|
_initialize(params) |
called once when the script is loaded. The params
values are given by the SlowDash configuration. |
_run() |
called once after _initialize(). If _run()
is defined, _halt() should also be defined to stop the
_run() function. _halt() will be called by
SlowDash when the user stops the system. |
_loop() |
called repeatedly after _initialize(), until the user
stops the system. To control the intervals, the function usually
contains time.sleep() or equivalent. |
_finalize() |
called once after _run() or _loop() |
These functions can be either the standard def or
async def.
Values can be pushed from SlowTask scripts to browsers for live
updates using the stream(name:str, value) method of
ControlSystem:
from slowpy.control import control_system as ctrl

V0 = ctrl.ethernet(host, port).scpi().command("V")

def _loop():
    ctrl.stream('V0', V0)   # pushing to consumers
    ctrl.sleep(1)
The types of values that can be streamed include numeric, string, dict, Python dataclass, SlowPy Node, SlowPy Data Element (histogram etc), and Matplotlib Figure (described below).
Instances of Matplotlib Figure can be directly pushed to SlowDash layouts.
import matplotlib.pyplot as plt
from slowpy.control import control_system as ctrl

def _loop():
    fig, axes = plt.subplots(2, 2)
    #... draw plots in the usual way

    ctrl.stream('mpl', fig)

    plt.close()  # If a figure is created in a loop, it must be closed every time.
    ctrl.sleep(1)
When a Matplotlib figure is streamed, a SlowDash layout (usually a
slowplot-XXX.json file under config) is
created dynamically for the same axes layout as the figure. The plotting
objects in the figure are extracted and converted to SlowDash objects
before streaming.
More examples can be found in
ExampleProjects/Streaming/Matplotlib.